Authentication
Phase two of the end-to-end pre-defined bundle purchase is to authenticate the user.
Description
Once the user has chosen the bundle they wish to purchase, the next stage is to prompt them to authenticate by either logging into an existing account or registering to create a new one. From this authentication phase, a session ID will be returned for use in subsequent calls.
The diagram and information below shows the client-side implementation of how to authenticate an existing user or create a new one. Please note that this phase can be performed before the user selects a bundle as they may already have an account and be logged in before they decide to purchase. The information below also assumes that eSuite is the primary identity management system, however it is possible to integrate a third party IDM in this phase.
Pre-requisites
- At least one pre-defined bundle configured within eSuite HQ. Please visit our Create a Bundle documentation for information on how you can achieve this.
Workflows
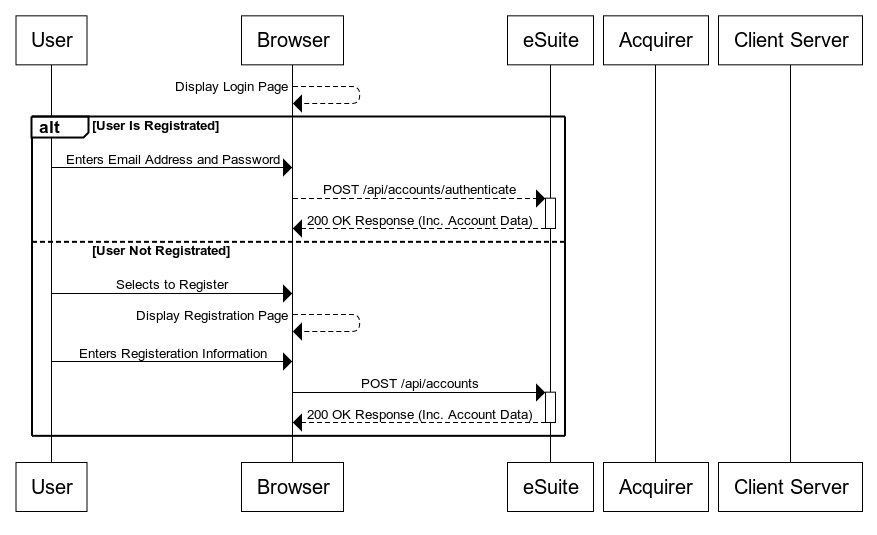
Phase two introduces session ids, created when a user authenticates or registers against the eSuite platform. The session id will then be carried through the rest of the journey and will be used in the APIs to carry out high security actions e.g. Account amendments, Payment Details capture and finally the Complete Purchase. As you see from the workflow above, the user has two alternative paths they need to choose from:
- User is Registered - The User has an account in eSuite and therefore needs to provide their Email Address and Password to authenticate against their account
- User Not Registered - The User does not have an account and must therefore register so that an account can be created for them.
Lets take a look at 'User is Registered' first.
User is Registered
If this user already has an account they must authenticate that account by using their email address and password. Once submitted the API to confirm these details and provide a session id must be called.
Authenticate by Email and Password
This API uses Client Open (Client Insecure) API authentication and therefore does not need a session id, but one will be returned in the response.
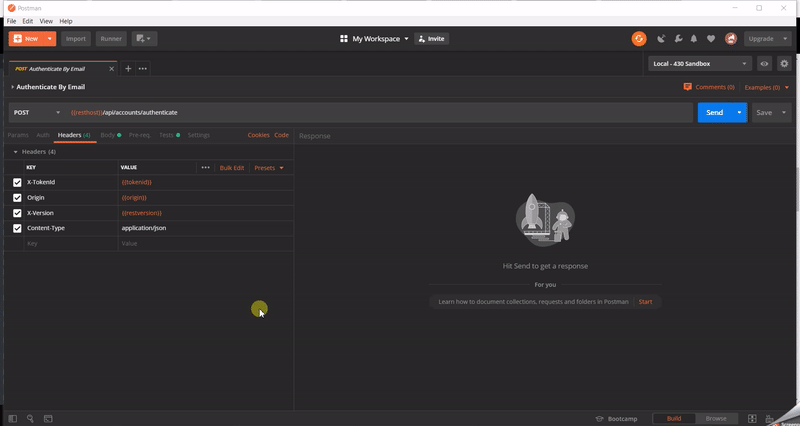
POST Authenticate Account
Once the account has been authenticated, the Account object is returned including a session token for use in further calls. The Postman collection will automatically save the account reference and session token to the environment variables.
User Is Not Registered
If the user does not have an account, they will need to register with the site. To do this you call the Create Account API.
POST Create an Account
This API again uses Client Open (Client Insecure) authentication headers and returns a session.
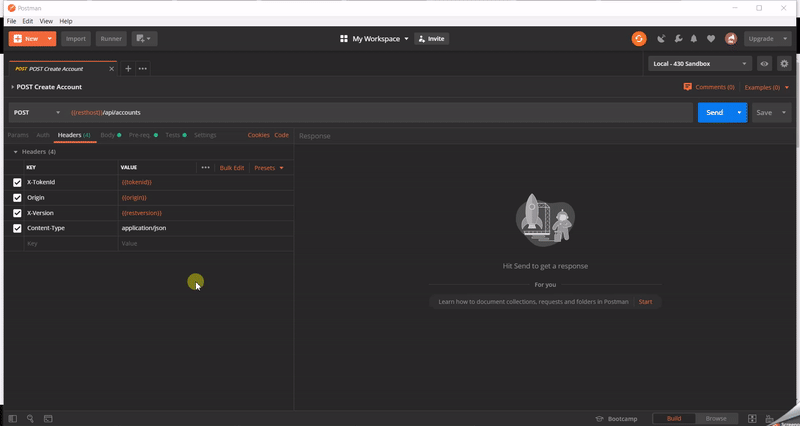
POST Create Account
Once the account has been created, the Account object is returned including a session token for use in further calls. The Postman collection will automatically save the account reference and session token to the environment variables.
Authentication
As these are a client-side API being called then client-side authentication is used for the API. API authentication method details can be found here: https://supportstaging.mppglobal.com/technical/esuite-rest-api-support/authenticating/eSuite Authentication Prerequisite
To enable the client side applications to call the eSuite Client Side API's you will need to provide MPP Global with the following:- A list of Origins
- Token ID
API Documentation
Details on the APIs used in the above are detailed below.
Authenticate By Email and Password
This endpoint provides the ability to authenticate an account using email address and password. Upon successful authentication, the account profile will be returned alongside a valid session token.
An example is shown below:
POST https://{restHost}/api/accounts/authenticate
Further information on this API can be found here.
Create an Account
This endpoint will provide the ability to create an account within the eSuite platform. Upon successful creation, the account profile will be returned alongside a valid session token.
An example is shown below:
POST https://{restHost}/api/accounts
Further information on this API can be found here.
Tips & Tricks
- Do you want to capture additional data when the user registers or even after the fact? Then custom parameters is the way. Did you know, eSuite supports custom parameters against a wide range of data models including Accounts. Check out this link on how to set them up in eSuite HQ and then just pass them into the POST or PATCH calls to add them to the account. Simple!
- Remember GDPR! Capture the users marketing preferences at registration and allow them to be updated at any time. Take a look at this link for more information on the market preference value in eSuite HQ and you can update the value using the API as well.
- There's more to Accounts than just registration and login, visit our developer centre and check out the Account section for the available functions.
- 'Keep it Simple' - When users go to register on your site they don't want to fill out endless fields, they want to get through it and start consuming your content. Keep registration simple and if you need further information, ask them after purchasing to visit their self-care profile. This will reduce drop off and get people purchasing.
- Want to keep an external system updated with account creations \ updates. Check out the Client Notifications section of our Support Centre to see how it works.
Next Steps
The next phase in the end to end journey is to capture address and delivery information. Continue your journey here.
Support
If you require any assistance with the above, please raise a ticket via the MPP Global Help Desk or email support@mppglobal.com